Connect this device
If this is the browser you bought in, this device connects by itself—nothing to enter. Otherwise, sign in with the email you bought with and we'll find your subscription for you. Nothing goes through Claude or your chat history.
You're signed in already — nothing to enter.
By connecting, you accept the Content Licence — once, here. You won't be asked again.
The key is used once for validation and is not stored by the plugin. This page stores no license key, transcript, prompt, file, or business content.

/check-setup (or say "check my setup") — Claude diagnoses the connection with you and offers the fix.You're in 🎉 Let's get you set up
Next, choose the app your AI Employees will run in. If you're new, start with Claude. You can switch anytime from the Board.
Let's get your AI Employee Builder running
Pick the app you use below and you'll only see your steps — short, guided, tick them off as you go. If you ever get stuck, Claude itself will walk you through it.
/whats-next). It picks up exactly where you left off and hands you the next step. You can't get stuck.
Recommended if you're newClaudeRuns in the Claude app with a project or folder attached. Add our plugin, open its connection page, done. All point-and-click. Pick this if you want a guided setup with no terminal.
Set up Claude →
 ChatGPT CodexRuns in the Codex app or CLI and works directly with your project files. Pick this if you already work in ChatGPT and want a workspace that builds directly with your files.
Set up ChatGPT Codex →
 Claude CodeRuns in your code editor (VS Code) or terminal, on your own computer. Pick this if you want full control, customization, and to go deep on AI engineering.
Use Claude Code →
👥✓ Join the community & say hi2 minutes — so help is one message away while you build
You’re connected. Now join the AI Employee Builders community (included with your membership). It’s where members and Rashid hang out, so when you start your first build, help is one message away. Access is instant.
Hi, I'm [name] — I run [what your business does, in one line].

Just set up my AI Employee Builder. The first thing I want to hand off: [the task you'd love to never do manually again].
claude terminal. Steps 2 & 6 match this.1✓ Install Claude CodeGet the editor + extension running
This is the one part you set up by hand — and once Claude Code is running, Claude can do almost everything after this for you. Three quick things:
⬇️ Download VS Code ↗
Run the installer with the default options.
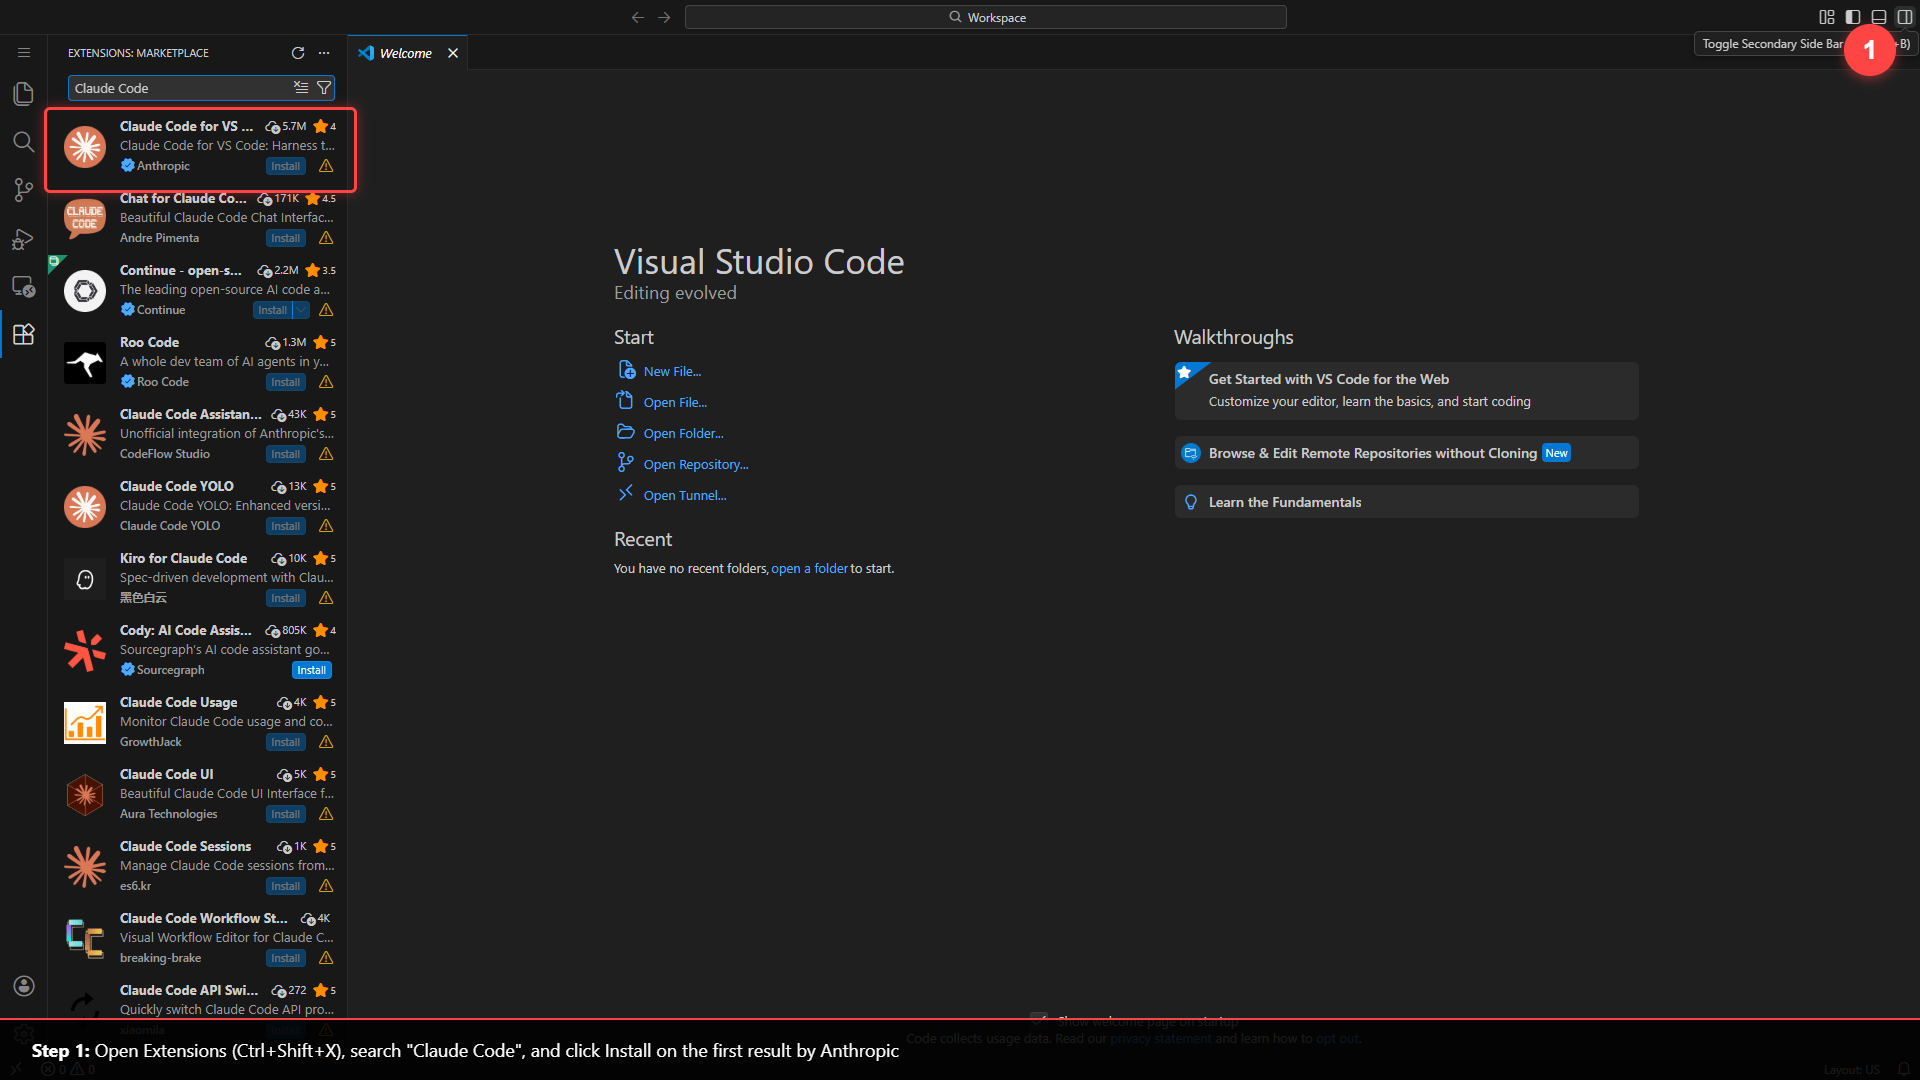
- Open VS Code → Extensions panel (Ctrl+Shift+X / Cmd+Shift+X)
- Search "Claude Code" → click Install on the first result by Anthropic
- Click the Spark icon (✦) top-right → sign in with your Claude account
Now that Claude Code is installed, you barely have to lift a finger. Paste this into the Claude Code chat — Claude installs the AI Employee Builder plugin and checks its connection. If the host asks you to connect, finish the secure browser step with the Google address attached to your purchase. Returning members are recognized from the membership already stored on the server; a license key is only a fallback on that secure page.
You are setting up AI Employee Builder v0.31.0 or newer in my Claude Code for me. It uses a thin plugin shell plus a hosted remote OAuth MCP server. Do as much as you can yourself, verify every step, and only hand work to me when Claude Code requires a human click or slash command.

MY SETUP - read carefully: I'm in the Claude Code VS Code extension. You CANNOT type slash commands into my chat for me. When something can ONLY be done by me, give me a short numbered "do this" instruction with the exact safe text to paste or exact thing to click, then STOP and wait for me to confirm. Never ask me to paste a license key into chat.

Your standing rule: use the simplest path. Try terminal commands when they are available. If they fail or my version does not support them, switch to the VS Code Manage Plugins panel and guide me one click at a time.

1. THIN PLUGIN SHELL - Install or update the free AI Employee Builder shell. It contains setup guidance and a remote connector declaration, not the paid skill bodies. Try the terminal first:
   claude plugin marketplace add https://github.com/the2hourclo/aieb-thin-plugin
   claude plugin install ai-employee-builder@aieb-thin-plugin --scope user
   If that fails, walk me through `/plugin` -> Manage Plugins -> Marketplaces -> add the GitHub marketplace -> Plugins -> install `ai-employee-builder` -> choose "Install for you" -> reload.

2. RELOAD - Run /reload-plugins (or reload the window), then confirm the installed shell reports v0.31.0 or newer.

3. CONNECT FIRST - Trigger the AIEB connector with a protected tool call. If Claude Code asks me to authenticate, tell me to click its native Connect action and finish the secure browser page. The page should recognize an existing course session or the Google address attached to my purchase before offering a Lemon Squeezy key fallback. Never request or repeat a key in chat. Do not look for the retired local connection commands, a local device token, or a local-runtime toggle.

4. ONBOARD - After the browser connection succeeds, run /setup-aieb (or tell me the exact command to type). Check for saved Get Access intake before asking anything. If my four onboarding answers are already saved, do not ask them again. If they are missing, ask these four questions conversationally, one at a time: what my business sells; which recurring job I want to remove; how often it happens and how much time it takes; and what a good finished result looks like. Once I answer all four, call `complete_aieb_onboarding` with those answers, confirm it succeeded, and continue setup.

5. BUILD THE WORKSPACE - Confirm the current project folder is the workspace I intend to use before changing a non-empty folder. Create only the AIEB workspace frame my access supports, then read the saved state back from that same folder before calling it ready. Connecting Notion, Drive, email, or other business systems is a separate step; do not claim those tools were wired automatically.

6. TEST AND CONFIRM - Tell me to type /check-setup (or say "check my setup") and confirm the plugin, connection, subscription, onboarding, and persisted workspace state all check out. If access is expired, cancelled, or for the wrong product, explain the renewal/help response instead of bypassing it. Then tell me setup is done and that the Business X-Ray is next in a NEW window inside this same project; do not start it in this session.

After each step, tell me whether it worked, or show the error and exactly how you're fixing it. Start now with step 1. Do not require a buyer-installed Node runtime for the AIEB connector.
/check-setup in the chat (or just say “check my setup”). You're looking for three green ticks:
- the plugin is installed
- the connection to your subscription is live
- your subscription is active
/whats-next to get back on track, or post in the community — the builders and Rashid will sort it with you.First, open Codex on the project where you want your AI Employees to work. If Codex is not installed yet, use OpenAI’s current setup guide:
Then paste the prompt below into a Codex thread. Codex adds the AI Employee Builder marketplace, installs the plugin, and tells you when to open the one fresh thread it needs.
You are setting up AI Employee Builder in Codex for me. It uses a free thin plugin shell plus a hosted, licensed MCP server. Do as much as you can yourself, verify every step, and never ask me to paste a license key into chat.

1. Add the official AIEB plugin marketplace with:
   codex plugin marketplace add the2hourclo/aieb-thin-plugin
2. Install or update the plugin with:
   codex plugin add ai-employee-builder@aieb-thin-plugin
3. Verify that it is v0.31.0 or newer and contains `.codex-plugin/plugin.json`, `skills/setup-aieb/SKILL.md`, and `.mcp.json`. Its MCP entry must be remote HTTP at `https://api.chiefleverageofficers.com/mcp`; do not launch the legacy local proxy or require Node for the connector.
4. Tell me to start one fresh Codex thread in this same project and paste exactly: `Set up AIEB`

Stop after giving me that one fresh-thread instruction. The new thread connects AIEB first, then runs onboarding. It must check for saved Get Access intake before asking questions. If the four answers are already saved, it must not repeat them. If they are missing, it asks conversationally what my business sells, which recurring job I want to remove, how often it happens and how much time it takes, and what a good finished result looks like; then it calls `complete_aieb_onboarding` with my answers before continuing. During workspace setup, Business OS must ask whether I serve named clients, identify each tool's real account or workspace, keep shared setup in one system record, and create client-to-system backlinks that Claude and Codex read from the same canonical records. Never request or repeat my Lemon Squeezy key in chat.
Start a fresh Codex thread in the same project. Claude uses /setup-aieb; in Codex, the equivalent command is the plain-language skill trigger below:
Set up AIEB
complete_aieb_onboarding before building your workspace.AGENTS.md, and keeps the skills you build in .agents/skills/.1✓ Install the pluginOne marketplace, one install — inside the desktop app
- Open Customize.
- Choose Personal plugins.
- Click +, then Add marketplace.
- Paste this name and click Sync:
the2hourclo/aieb-thin-plugin
- Click Install on AI Employee Builder. Claude shows a red “make sure you trust this plugin” notice for every plugin it didn’t make; this one is ours.
Need help with this step?
- Want to watch it first? The 1-minute walkthrough is below.
- Don’t see Personal plugins? In some versions of the Claude app the menu reads Customize → Plugins → Add → Add marketplace. Plugins need a paid Claude plan (Pro, Max or Team). Update the Claude desktop app (quitting and reopening usually does it), then look again. On a managed Team or Enterprise account, an admin may have to allow personal plugins first.
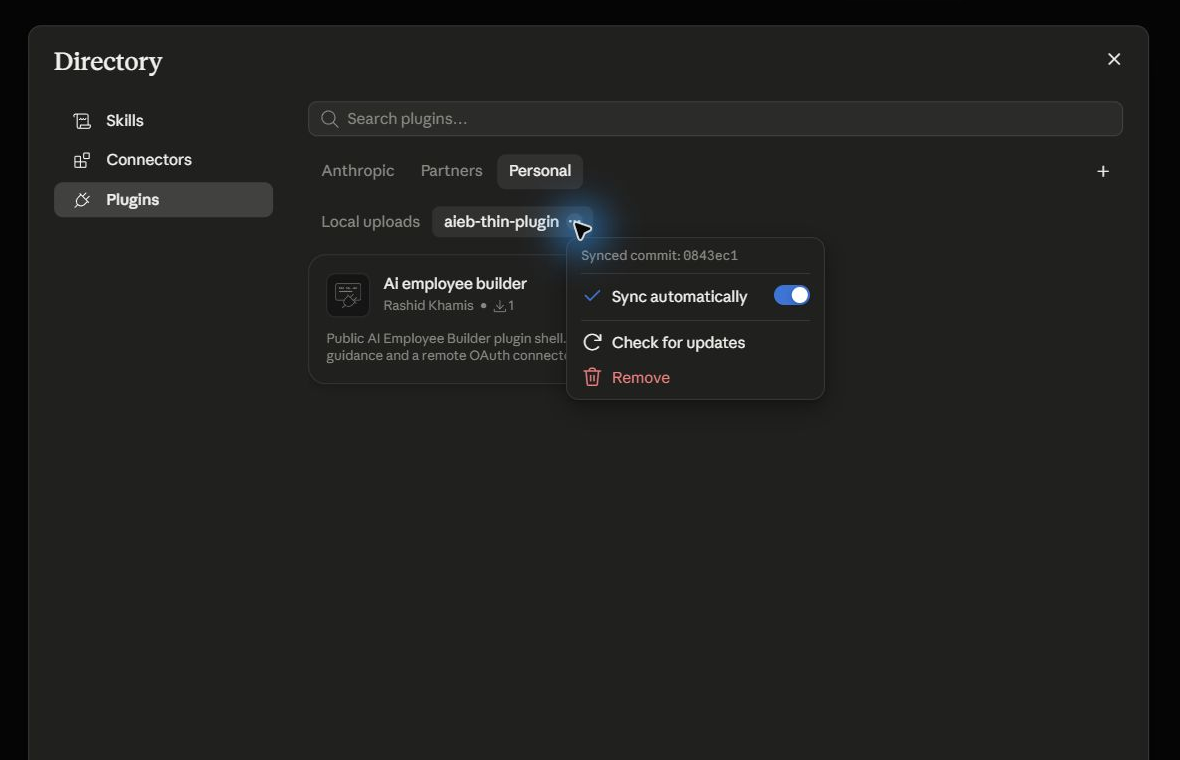
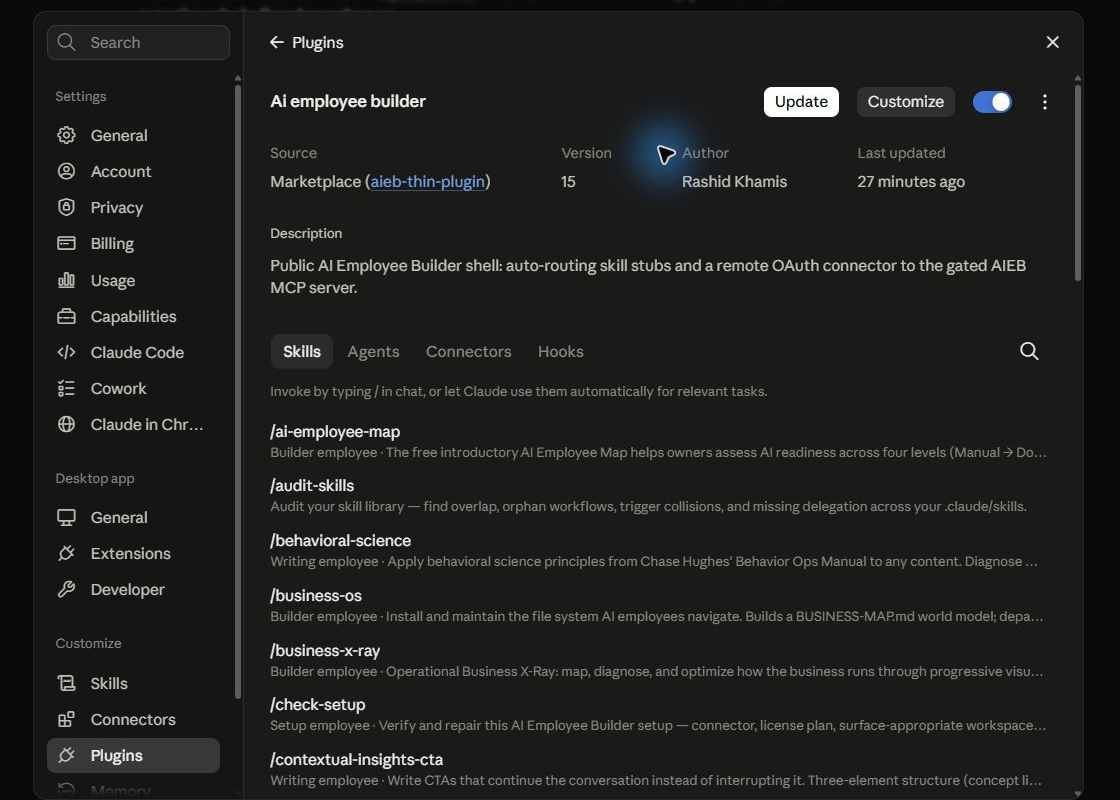
- Already have the plugin? Update it instead: open Browse plugins → Personal → aieb-thin-plugin, click the three dots (…) and choose Check for updates. Then open Customize → Plugins → AI Employee Builder and click Update if you see it.
- Still stuck? Post in the community and we’ll sort it out with you.
2✓ Connect & onboardStart a project, run one command, sign in
- Choose New chat → Project.
- Click Add folder and pick a folder for your business that you’ll keep.
- In that project’s chat, type this command and press Enter:
/ai-employee-builder:setup-aieb
- Click Connect and sign in with Google, using the email you bought with. Then go back to the same chat.
- Answer Claude’s questions about your business, one at a time. When it says your workspace is ready, you’re done.
Need help with this step?
- Want to watch it first? The 10-minute walkthrough is below.
- The command doesn’t show up? Type “set up my AI Employee Builder” instead. Claude may also shorten the command to
/setup-aieb, which is fine. - Coming back later? Open the same project instead of starting a new one.
- Claude asks permission to create files or folders? Click Allow. It only works inside the folder you attached.
- Paid with an email that isn’t a Google account? The sign-in page lets you use your license key instead. It’s in your receipt email. Enter it on that page only, never in the Claude chat.
- Claude says the connection expired but still shows it as Connected? Open Customize → Connectors → aieb, disconnect it, then connect again.
- The connection didn’t light up? Update the plugin (step 1’s help has the clicks), go back to the same project and type
/check-setup. - Your folder already has files in it? That’s fine. Claude names the folder and asks before changing anything.
- Still stuck? Post in the community and we’ll sort it out with you.
🎉 You're all set
You're connected and the workspace was verified in its attached folder. Next: open a fresh chat inside this same Claude project with the same folder attached, then say “x-ray my business”. That keeps your saved context available while the X-Ray maps how your business works and names the first work to hand off.
🔬 Start the Business X-Ray →3✓ Install Draw.io Desktop (optional)You'll build maps and diagrams as you go — this opens them
You'll build maps and diagrams as you go — your onboarding already drew an AI Employee Map as a .drawio file. Draw.io Desktop is the free app that opens, edits, and exports them (no browser, no account). Install it whenever you want to see them full-size.
Run the installer for your OS.
4✓ Connect the Draw.io connector (optional)So Claude can draw straight into it
/check-setup — Claude diagnoses the connector and workspace separately, then offers the right fix. Still stuck? Post in the Polynet community.Your workspace now knows where your files live. It also needs to know where your live business data lives — the emails you've sent, your tasks, your client records, this month's numbers. For most businesses that's in Notion, Google Drive, or an inbox, not in the workspace at all.
/setup-aieb verifies access and the saved workspace frame; it does not automatically connect every third-party business system. Use this step to add only the tools your business actually needs.Don't remember being asked? Paste this into your chat and Claude picks it up — it asks what your business runs on, goes and finds the real databases and folders, and confirms each one with you before writing anything down. It won't re-ask anything you've already answered:
Connect my business tools. Ask me what systems my business actually runs on, then find the real databases and folders in each one and confirm them with me before writing anything down. For anything not connected yet, walk me through connecting it on my setup. Then prove each one works with a real query.
connect my tools.Before the Business X-Ray, watch this overview — it shows how handing AI one map of your business turns it from a tool you babysit into an employee that runs the work. Below the video is exactly why that map matters and how it works — then two quick questions to continue.
Why you give your AI a business map
A business map is one file plus a set of department folders — a model of how your whole business runs and how it makes money (Leads → Appointments → Presentations → Sales). It's the single thing that turns AI from a tool into an employee.
Without a map
- Your AI doesn't know where anything lives or how you make money, so you hand-hold every task. You stay the router — every request runs through you.
With a map (how it works)
- A request comes in → your AI reads the map, opens the right department, pulls what it needs, and does the work — the way an employee would. That's how it handles most of your requests without you in the loop.
You already started this
- When you ran
/setup-aieb, it created and verified your starting workspace frame in the attached Project folder. - The Business X-Ray (next) fills that frame with your business — how it actually runs and the first job to hand off.
Quick check — make sure the mechanism clicked
1. With your business map in place, what changes about how a request gets handled?
2. What must be true before your Claude workspace is ready for the Business X-Ray?
AGENTS.md and .agents/skills/ conventions. Next: open a fresh Codex thread for the Business X-Ray.You've built your first one. From here the roadmap shows you the whole path — make it reliable, connect skills into a system, hand work to an agent, put it on autopilot — one step at a time, with copy-paste prompts for common jobs (content, sales, client delivery, admin). In Claude or Codex, you can just say what's next anytime; your board is the map.

Plug into the people building alongside you — share what you're building, get feedback on your AI Employees' output, and join the monthly group call. It's included with your subscription.
Open the community ↗Fastest fix is to let Claude diagnose it live. Copy this, paste it into Claude Code, and add what you saw where it says [describe...].
I'm installing the AI Employee Builder plugin in Claude Code and I'm stuck.

Here's what happened: [describe the error or what you see on screen].

Please help me fix it. Background on how this install works:
- The local plugin must be v0.31.0 or newer. It is a thin shell with a remote HTTP MCP declaration, not a local Node proxy and not the paid skill bodies.
- Paid AIEB instructions come from https://api.chiefleverageofficers.com/mcp through `get_skill`.
- A paid tool call triggers the host's native OAuth Connect flow when authentication is missing. The secure page first recognizes an existing course session or the Google address attached to the purchase; a Lemon Squeezy key is only a secure-page fallback.
- Returning members should reconnect by signing in with the purchase address. Do not ask them to delete local files or use another license activation just because the host changed.
- Connect AIEB before onboarding. If Get Access intake is incomplete, `/setup-aieb` asks the four business-context questions and calls `complete_aieb_onboarding`; if those answers are already saved, it must not repeat them.
- Do not look for retired local connection commands, a local device file, or a local-runtime toggle. Those belong to the older connector.

Check the installed plugin version, its remote `.mcp.json`, whether `get_skill` is visible, and whether a paid `get_skill` call produces a normal authentication challenge. Then explain the problem in plain English and give me the exact next step. Never request or repeat my license key in chat. If Claude Code needs me to type a slash command or click Connect, tell me exactly what to do and wait.
| What you see | The fix |
|---|---|
| A new command doesn't appear | You skipped a reload. Type /reload-plugins, or reload the window (Ctrl/Cmd+Shift+P → "Reload Window"). |
Install or connector fails mentioning node | You are on the legacy local connector. Update AI Employee Builder to v0.31.0 or newer, reload, and verify its MCP URL is https://api.chiefleverageofficers.com/mcp. |
| The MCP says 401 or unauthorized | Use the app's Connect action for AI Employee Builder, finish the secure sign-in page, then retry. Use your purchase Google address first; never paste a key into chat. |
| "Key bound to other plugin" | That key is for a different product — each key activates one plugin. Re-check the key in your Lemon Squeezy email. |
| "Expired" or "Revoked" | Your subscription lapsed. Renew at My Orders, then reload Claude Code and try the MCP call again. |
| Skills don't show up after install | Reload Claude Code. If the plugin is installed but the MCP is missing, check the plugin's .mcp.json config. |
| The local plugin folder looks tiny | That is expected. The local plugin is only the shell; paid skill instructions load from the hosted MCP. |
| A returning member is asked to connect again | That is normal once per host. Sign in with the purchase address; AI Employee Builder finds your membership and moves your old connection over when it can. |
/plugin not recognized | Claude Code is outdated. Update the extension (Extensions panel → Claude Code → update), reload, retry. |
Connecting on a different device or browser than the purchase? Here's where your key is
noreply@lemonsqueezy.com — check spam, or search your inbox for "Chief Leverage Officer" or "license"), or go to app.lemonsqueezy.com/my-orders, enter the email you bought with, click the magic link, and open your order — the key (with a copy button) is right there. Got your key in an email from Rashid (e.g. a free-access invite)? Use that one. Enter the key on the secure page only — never in Claude or any chat.Do I need to know how to code?
Why install a thin plugin plus MCP?
Does my license key work on more than one computer?
Why doesn't it need Node.js anymore?
How do updates work?
Can I use this in Claude?
the2hourclo/aieb-thin-plugin). Then choose New chat → Project → Add folder, or reopen the existing Project and workspace folder, and say set up my AI Employee Builder. If Claude shows Connect, finish its secure browser flow and return to that same Project chat. Type /check-setup there if the paid tool does not retry.